When working on a live action feature we are typically provided with shots, which basically mean a sequence of raw images - also called “plates” - that were created as a product of digital filming. These shots are provided to us in a raw format, dependant on the filming camera, which can either be a logarithmic or linear space. This can quickly get confusing, especially when painting in Photoshop, so let’s have a look at what’s the difference between these color spaces and how to approach them from a painter’s perspective.
Linear versus sRGB
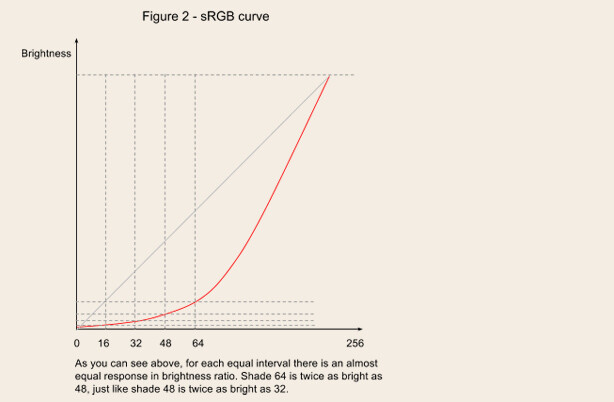
In a linear color-space, the relationship between the stored numbers and the values they represent is a linear 1:1 ratio. This means that, for example, if you double the number, you double the intensity. That sounds really easy, but the problem is that the human eye sensitivity to light is much finer at lower intensities than at high intensities. In particular, if we're using 8 bits to represent values (which means a total of 256 shades), we'll end up with too many light shades, and not enough dark shades (figure 1).

Thus, while a linear space makes perfect sense to use for computer processing, it is not suitable for human viewing because our eyes expect to see about the same amount of brightness change in between equal intervals. For example, our brain expects to see shade 32 twice as bright as 16, and shade 48 (which equals 32+16) twice as bright as 32.
To address this problem, most modern monitors apply a transformation called sRGB, a standard which uses a gamma curve to make the colors non-linear (figure 2). The curve is shallower at the bottom, so it can display more dark values, and steeper at the top, so it can have fewer light values.
So now that we’ve briefly seen what linear and sRGB stand for, we are facing the following issue: we want our images to be processed in a linear space - which is computer friendly, but stored in sRGB - which is human friendly; However, since we’ve already established that 8bit linear doesn’t have enough dark shades, this could cause problems when converting to and from linear. As such, the solution we found was to widen the range from 8 to 16/32 bits, thus having much more dark shades to work with. These kind of images are called HDR (high dynamic range) and are typically stored as 32bit OpenEXR (.exr).
So, problem solved? Sadly not for painters; If working in 32bit was an option, then we wouldn’t have had a need for this article. Alas, most Photoshop tools function properly only in 8 or 16bit modes and there are two problems we encounter when we try to view a 32bit linear image back inside a regular 8/16bit sRGB workspace:
- Without a way for the software to know how to display all that information, an unmanaged 32bit linear image will appear to have very high contrast, meaning very dark midtones and over-exposed highlights (figure 3). Part of this problem can be solved by applying an inverse gamma curve.
- Converting a 32bit HDR image into an 8bit LDR equivalent is a destructive process, because we’re losing all that extra information we tried to save in the first place. This is usually referred to as ‘value clipping’ so when a compositor tells you the painting doesn’t have enough range or that it’s ‘clipped’, it usually means it doesn’t have enough detail in the highlights and/or shadows. Note: This also happens when you start and create your painting in an 8 bit workspace and then pass it off to comp.
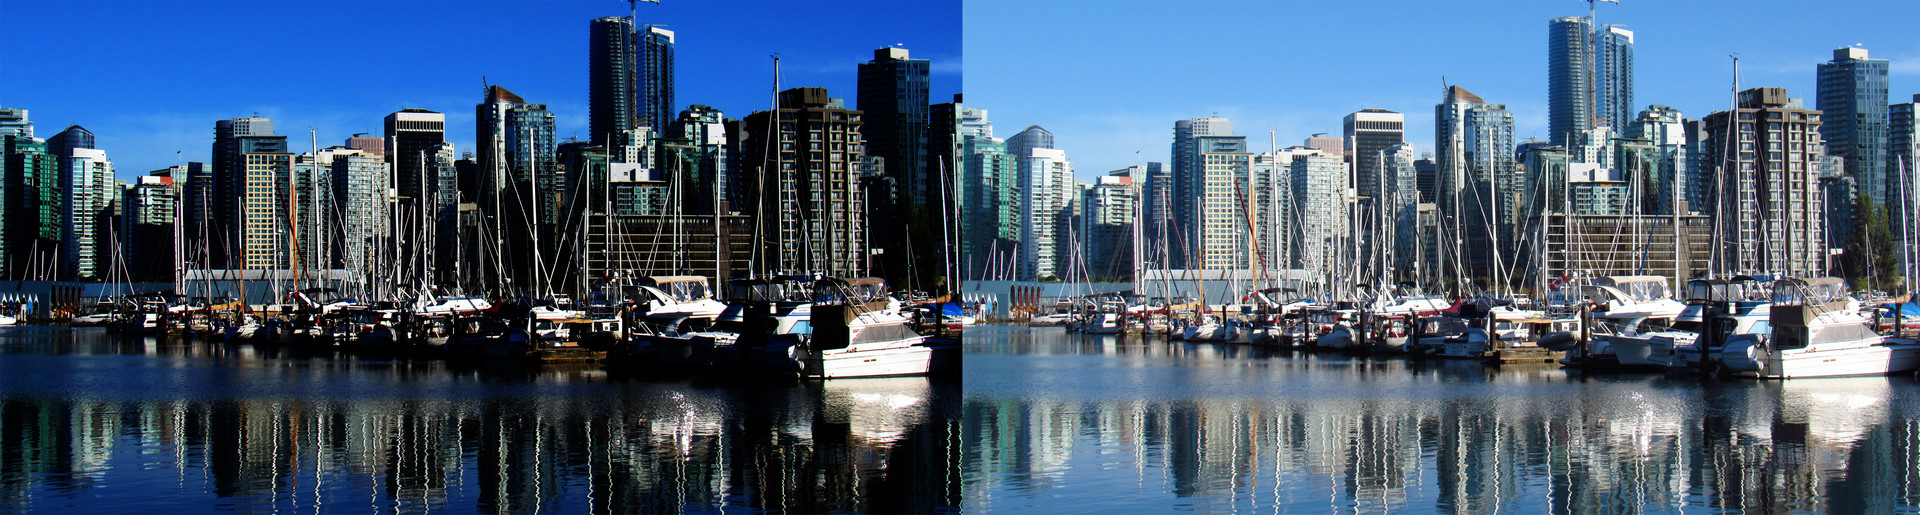
Figure 3. Left image represents an unmanaged linear 32bit image. Right image is the proper managed view.
So then how can we solve this problem as painters?
Since most Photoshop tools function properly only in 8 or 16bit modes, we need to find a way to paint in those modes while retaining all - or most of - the information available in a 32bit format. Here comes “Log” to save the day!
Log (short for logarithmic)
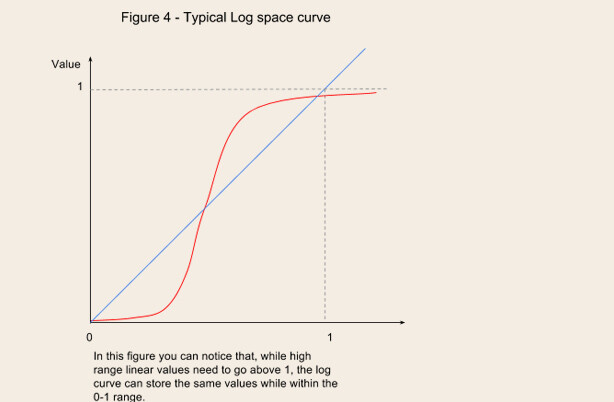
You can think of log as a color space “archiver” (in the same way zip or rar does it for files). This is because, while linear space increments values in equal steps, a logarithmic color space compresses the values in the white and black areas of an image, thus minimizing the space required to store the information (figure 4).
As a side effect, this format also allows us to paint in more manageable formats such as 16 bit .tif; This is because, if you follow the above analogy, a 16 bit log file can “unarchive” to a 32bit linear format without clipping.
The most common log formats that you will encounter are ARRI Log and Cineon Dpx.
Log Painting Workflow for Matte Painting
Whether you were provided with a log plate or you converted a linear one into the log equivalent, you will need to do some color management in order to be able to paint accurately.
Typically this involves several operations:
1. Displaying the log material with the target LUT
As “log” images represent a very large dynamic range, most midtone pixels reside in the middle portion of the coding space. Thus, if you directly display a ‘log’ image on a regular sRGB monitor it will appear to have low contrast and desaturated colors so some form of color management is required in order to preview the plates with the right color profile.
The way we do this in Photoshop is by applying a ‘Color Proof’ preview based on a LUT (Look Up Table) which tells the software how to tone map the colors and values of the Log image in order to make it look like the target profile. Please note that this display transform is never baked into the image and represents only a preview since we want to preserve the color space.
This option is found under View>Proof Setup.
Tip: Pressing CTRL+Y allows you to quickly toggle on and off the color proofing. Do this often in order to check for values, especially darks; Sometimes what looks right in the preview can actually be wrong in the Log space.
2. Converting reference images to the log color space
As matte painters, we often work with photo refs to create our environments. The problem is that, unless created by the same camera, these images are most likely in a different format, more commonly as 8bit sRGB. Since we intend to preserve the plate and deliver our paintings in the same space as it was provided to us, we need to convert the reference before we can use it. There are three ways of doing this and I will list them from the least prefered to the best one.
- Adjustment layers: If you have a very keen eye, you can use a combination of adjustment layers such as Curves, Hue/Saturation and/or Color Balance in order to match the reference to the Log space. Please note that while doing so you need to toggle off your color proofing and look into the raw, low contrast view of the plate, making sure that all levels match.
- Photoshop conversion: You can convert the refs directly in Photoshop by using a Color Lookup adjustment layer and loading a 3 dimensional look up table (3D LUT) file. This method is however reliant on being provided with an accurate lut file and is prone to errors, so make sure you double check everything after you convert.
- Nuke conversion: If you have access to Nuke, you can bring the refs in there and easily output them in the right color space. This process can even get automated with the help of a script, and it’s also the most accurate!
3. Converting back to linear
As we’ve discussed before, all other CG workflows/pipelines - such as compositing, lighting, lookdev - are based on a linear space processing. We’re only using a log space to make it easier for us, but once we’re done with the painting we need to convert it back to 32bit linear so that the other departments can use it.
The easiest way to do this is by doing a conversion in Nuke, but each studio has it’s own conversion tools so please check with them first.
In conclusion
I hope this article helped to explain the differences between linear, sRGB and log spaces, as well as why do we prefer to paint in a log space and how to properly manage it! If you have any questions or you found a certain part of article to be unclear, please feel free to contact me!